Monday 12 February 2024

We must be crazy... but it's our 12 hour CROCHET-A-THON fundraising event!!!!


Meet my son Walt! Crochet dude! Fundraiser extraordinaire!

Well, this is so exciting! My 17 year old son Walt has been lucky enough to be offered a place on a biodiversity and conservation field trip to South Africa with Operation Wallacea as part of his biology studies at college this summer! So, we are going into full-on fundraising mode to help him pay for this incredible opportunity, as it is 100% self-funded (yes, it’s verrrrrry expensive)! And this is where me and my crochet skills come in! Walt and I are planning a...


12 hour Non Stop Crochet-A-Thon, 8am to 8pm on Saturday 17 February!


That's right! 12 hours of NON STOP CROCHET - the lad can crochet pretty well so we are going to go for it and crochet non-stop to raise funds for his trip! If you would like to support Walt and keep his hook hooking (and mine for that matter!) for 12 hours we would be so happy and grateful. You can find out more about Walt and his field trip with Operation Wallacea (including how to make a small donation to the fund) HERE


Who is Operation Wallacea?

Operation Wallacea is a network of academics from European and North American universities, who design and implement biodiversity and conservation management research expeditions. Since their inception, they have identified hundreds of new species of birds, amphibians, reptiles and mammals, and have to date published over 640 research papers. They are an extremely well-respected international non-profit organisation. You can read more about them HERE


What will we be doing on the day?

Well, in a nutshell, Walt and I will be crocheting alllllllll day long! I will be making a NEW Seed Pod Throw blanket design:


and... excitingly... this pattern will be available FOR FREE here on my Blog from 8am to 8pm GMT on Saturday 17 February if you want to grab a screenshot of it. Walt will be making a poncho for himself in lovely earthy colours, perfect to take with him on his expedition to South Africa in July- I hear it gets chilly at night so a cosy crocheted poncho will keep him warm!


Friday 1 December 2023

CRUNCH STITCH SHAWL - A FREE PATTERN!

Hello there, dear crochet fans!

Another day, another free pattern. I know.  You're welcome. I'm on a roll!

Introducing: the Crunch Stitch Shawl! 


This is a rather lovely shawl to make for several reasons. Firstly, it's an absolute corker of a stash buster, as you can use any colours, go super-stripey, or 2-tone, or however you feel... dive into that yarn stash! Secondly, it's a very easy pattern - it's basically a simple single row repeat. Thirdly... well, what a great Christmas gift for a loved one! It's a beautiful warm and cosy shawl, which you can make to any size to suit. A little version for a child, or just keep adding rows and go super-large for anyone who loves wrapping up big time for winter walks! Bobble edging or no bobble edging... but you know me... I'm Team Bobble every time!


The stitch used, the crunch stitch, is probably in my top 3 stitches of 2023, I'm obsessed - it was one of 100 patterns featured in my recent book Mix and Match Modern Crochet Blankets, available to buy from all decent booksellers if you want to explore more new stitches!


So, without further ado, here's the free Crunch Stitch Shawl pattern for you. Enjoy it! You can use this pattern, share it, even make shawls and sell them, but please always give me credit as the designer, and don't be a numpty and pass this pattern off as your own! Respect, peace and love!


YOU WILL NEED

Hook: a 6.5mm crochet hook

Yarn: Any dk/light worsted yarn of your choice 

I used the following:

Scheepjes Colour Crafter

Yarn A: Nijmegen (approx 80g)

Yarn B: Verviers (approx 24g)

Yarn C: Rotterdam (approx 12g + 20g for edging)

Yarn D: Hilversum (approx 12g)

Yarn E: Wolvega (approx 12g)


ABBREVIATIONS (UK terms):

ch: chain

dc: double crochet (US single crochet)

htr: half treble crochet (US half double crochet)

lp(s): loop(s)

rep: repeat

RS: right side

ss: slip stitch

st(s): stitch(es)

WS: wrong side

yoh: yarn over hook


Colour stripe pattern as follows (with number of rows worked in each colour, e.g. 8A means 8 rows in Yarn A):

(8A, 2B, 2C, 2D, 2C, 2B, 8A, 2E, 2B, 2D, 2B, 2E) twice, then 10A to finish.


SPECIAL STITCHES

Bobble: Ch3, work the following in the first ch made: (yoh, insert hook in ch, yoh, pull up lp, yoh, draw through first 2 lps on hook) 3 times, yoh, draw through all lps on hook, ch1, ss in same first ch made.

How to change colour: Work the last dc of the row up to the final 2 loops on the hook, yoh with the new colour, draw through new colour to finish stitch. Fasten off old colour. I like to knot the old and new colours together for security, before weaving in ends. 


MEASUREMENTS (including bobble edging) 

Width from top corner to top corner: 130cm

Length from top middle to bottom point: 46cm


Keep ALL stitches fairly loose, especially the slip stitches, to make sure you can insert the hook easily on following rows.


INSTRUCTIONS

With Yarn A, ch2.

Row 1 (RS): 3dc in first ch made, turn.

Row 2 (WS): Ch1 (does not count as st throughout), (1dc, 1htr) in first st, ss in next st, (1htr, 1dc) in last st, turn.

Row 3: Ch1, (1dc, 1htr in first st), 1ss in next st, 1htr in next st, 1ss in next st, (1htr, 1dc) in last st, turn.

Row 4: Ch1, (1dc, 1htr in first st), 1ss in next st, *1htr in next st, 1ss in next st; rep from * to last st, (1htr, 1dc) in last st, turn.

Row 5 onwards: Rep Row 4, following colour stripe pattern (see above). See Special Stitches for colour change technique.

Fasten off and weave in all ends.


EDGING

Using Yarn C and with WS facing, join yarn with ss in ch at bottom point, *make bobble (see Special Stitches), 1dc in each of next 4 row ends up towards top corner; rep from * to top corner, adjusting bobble placement as necessary so that you make a bobble in the top corner st.

Work along top edge as follows: *1dc in each of next 5 sts, make bobble; rep from * to end of top edge, adjusting bobble placement as before so that you make a bobble in the next top corner st.

Work down final side as you did for the first side. Ss to first ss to finish. Fasten off, weave in all ends.


And there we are, all done.


If only Hank Deluxe wouldn't be quite so judgey with his eyes when I'm designing new things. It freaks me out.


Happy crocheting, happy days.
Esme xx


Wednesday 1 November 2023

MIXED UP MITTS: A FREE PATTERN!

Well hello there, dear crochet fans. How are you all doing? With winter fast approaching here in the Northern Hemisphere, I thought we could get stuck into a fun (and FREE!) mitt pattern, to keep your precious crocheting hands cosy through the chilly days ahead. 


Introducing... the Mixed Up Mitts! Arent they fun? So bright and colourful and textured... and soo easy too, bonus! PLUS they are a total stash-busting project which is great to use up all those little bits of yarn. You can of course go with a less dazzling colourway, even 2-tone, whatever you fancy, but if you know my work, you'll know I just happen to love all the bright colours! Feel free to mix it up as much as you like with the colours!

Why are they called Mixed Up Mitts?? I hear you ask. 

Well, firstly because the pattern is based on one of the 100 (yes, you read that correctly, 100!) patterns in my new book Mix And Match Modern Crochet Blankets, out now! The book is an Aladdin's Cave of ideas and inspiration for you to create your own, unique mix and match modular blankets and homewares. It comes with masses of ideas for stash-busting projects, colour guidance, and instructions how to recreate the 5 Vibe Blankets I made... or totally go your own mix and match way and create your own masterpieces! You can purchase the book from all decent booksellers, such as Amazon, Blackwells, Waterstones, and don't forget to support your local independent shops too ♡ It's published by D & C Books, and I used Scheepjes Colour Crafter for all the projects within.


Secondly... and this bit I'm REALLY pleased with... you can go with ANY colours you like, and wear the mitts interchangeably between your 2 hands, so the stripes will appear differently if you switch the mitts around. In essence, 2 pairs of mitts for the price of one! They are the ultimate Mixed Up Mitts! This is the same pair of mitts below, just shown on the front and back (or back and front, depending which hand you wear which mitt on!)


So, let's get mitt-making!

A few TOP TIPS which are worth reading before we start:

Use any yarn you like for your mitts, but dk (light worsted) works best I think. I used Scheepjes Colour Crafter in the following shades for the stripes:

1062 Dordrecht

1820 Goes

1063 Rotterdam

1435 Apeldoorn

1711 Leeuwarden

1064 Veenendaal

1218 Zandvoort

1712 Nijmegen

1027 Arnhem

1422 Eelde

1203 Heerenveen

2002 Gent

2009 Kortrijk

1240 Ommen

1009 Utrecht

1824 Enschede

and 1063 Rotterdam again for the edging. Each mitt used approximately 1g yarn per stripe, and 3g of yarn for the edging. Each mitt weighs approximately 19g.


Use a 5mm hook for the main mitt, and switch down to a 4mm hook for the edging around the top, bottom ribbing and thumb hole. This is to make a cosy, tighter edging all around.


The mitts are worked ‘vertically’, so simply work the pattern until the mitt fits around your hand. Measuring around your hand at the base of your four fingers will give a good indication of the finished length to make your crochet panel for each mitt. For example, my hand measures approximately 18cm, so each crochet panel was worked in stripes until it measured just under 18cm, giving a little ‘stretch’ to the mitt so it is not baggy. No one wants a saggy mitt, do they?


If you have made mitts with lots of different striped colours, MAKE SURE when you add the edging to your second mitt that it mirrors the first mitt so that the SAME colour stripes appear on the front of your mitts. See my pictures above.


Work all stitches quite loosely so it's easier to insert the hook into them on subsequent rows. The main mitt textured stitch is called the Crunch Stitch, made of ss and htr.


Abbreviations (UK terms):

BPtr: back post treble crochet (US back post double crochet)

ch: chain

dc: double crochet (US single crochet)

htr: half treble crochet (US half double crochet)

FPtr: front post treble crochet (US front post double crochet)

rep: repeat

RS: right side

ss: slip stitch

st(s): stitch(es)

tr: treble crochet (US double crochet)

WS: wrong side


Instructions

Using a 5mm hook, ch22 with your first colour.

Row 1: 1dc in second ch from the hook, and in each ch to end, turn. [21 sts]

Row 2: Ch1 (does not count as a stitch throughout), 1ss, *1htr, 1ss; rep from * to end, turn.

Row 3: Ch1, 1htr, *1ss, 1htr; rep from * to end, turn.

Change to your second colour, fasten off your first colour.

Repeat Rows 2-3 (finishing on either row, and changing colour at the end of Row 3 every time) until your panel measures 0.5cm shorter than your required length to fit around your hand.

Final Row: Ch1, 1dc in each st to end.

Fasten off, and weave in all ends.

(I worked 33 rows in total for my mitts.)


How to seam your mitts:

Fold your mitt in half with WS facing out. Thread a darning needle with a 30cm length of yarn, and whip stitch along 6 stitches from each end towards the centre in turn. This will leave a 9-stitch 'gap' in the middle for the thumb hole. 


Now turn your mitt to RS facing out.

For the edging, use a 4mm hook. Keep stitches quite tight to make a snug edging.

Top Edging:
Using your edging colour yarn and a 4mm hook, join your yarn with a ss in any row end on the top edge.
Round 1: Ch1, 1dc in each row end around, join with ss to first dc.
Rounds 2-3: Ch1, 1dc in each st around, join with ss to first dc.
Fasten off and weave in ends. If you wish, add more rounds of dc edging as required.


Bottom Edging - Ribbed Cuff:
Using the same yarn and hook, join yarn with a ss in any row end on the bottom edge.
Round 1: Ch1, 1dc in each row end around, join with ss to first dc.
Round 2: Ch2 (does not count as a st throughout), 1tr in each st around, join with ss to first tr.
Round 3: Ch2, *1FPtr, 1BPtr; rep from * around, join with ss to first FPtr.
Round 4: Rep Round 3, making sure you always work a FPtr around a FPtr, and a BPtr around a BPtr from the previous round.
Fasten off and weave in ends. If you wish, add more rounds of FPtr-BPtr ribbing as required.


Thumb Hole:
Using the same hook and yarn, join yarn with a ss in any st on the thumb edge.
Round 1: Ch1, 1dc in each st around, join with ss to first dc.
Rounds 2-3: Rep Round 1.
Fasten off and weave in ends. If you wish, add more rounds of dc as required.


And there you have it! Cosy, fun, stash-busting mixed up mitts! I hope you've enjoyed this pattern.

Happy crocheting!

Esme xx


Monday 4 April 2022

Introducing... The Hoooked 2022 Bath Mat: Every Home Should Have One!


Hi everyone, I am sooo excited about this project! I've been following the yarn company HOOOKED for quite some time now, and I've been dying to get my hot hooky hands on their fabulous 100% recycled yarns - I had an inkling that Hoooked yarns and mosaic crochet would be a match made in heaven. And I think my 2022 bath mat just goes to prove that!

Hoooked are creators of recycled yarns which are not only beautiful and durable, but which are produced in a sustainable way which respects nature. If you're looking for a more eco-conscious approach to crafting with yarn, I'd certainly recommend looking them up. Like me, you might think that recycled yarn means fairly neutral shades, but this is so not the case. The colours are vibrant, a rainbow of delight across their huge range, some yarns even have glitter running through them!! That's an adventure for another time though...

After some excellent discussions with the lovely Geesje Mosies, founder of Hoooked, about how best to showcase their yarns, and some extrememly fun swatching sessions playing around with lots of goodies from their range, I decided to make a bath mat with their Eco Barbante range. It's a durable yarn which is really flexible as it is not too thick. It comes in a great choice of colours too.


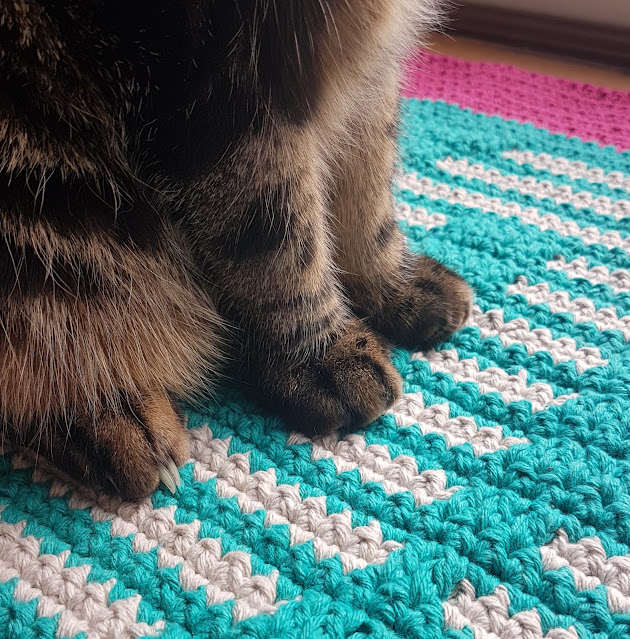
I used two strands of yarn held together to make the mat, using a 5.5mm crochet hook. And the result is a gorgeously thick and hardwearing mat, which is surprisingly soft and delightful underfoot too. For humans and cats alike.


As a gift to you, I'm sharing the 2022 Bath Mat pattern for free! If you'd like to make one and share your finished masterpiece, use #2022bathmat on the socials so we can all admire your version. Of course, this doesn't have to be a bath mat, it would look great in a kid's bedroom, or in the hall, or by the fire, or... well, it would work anywhere. And as Hoooked produce so many beautiful colours, you could really customise this mat just for your home.


You will need:

Yarn

Hoooked Eco Barbante (85% recycled cotton, 15% other recycled fibres)

Please note: I crocheted the mat quite tightly to give a dense fabric. You may find you need slightly different quantites of yarn, but I used the following shades and quantites for my mat:

Yarn A Punch 350g (1 x 200g bobbin, and 3 x 50g bobbins)

Yarn B Lagoon 500g (2 x 200g bobbins, and 2 x 50g bobbins)

Yarn C Biscuit 300g (1 x 200g bobbin, and 2 x 50g bobbins)

Hook

A 5.5mm crochet hook 

Other tools

A darning needle or a thin crochet hook to weave in the ends

Measurements

My finished bath mat measures approx. 55 x 79cm 

Abbreviations (UK Crochet Terms)

approx: approximately

ch(s): chains(s) or chain stitch(es)

ch-1 sp(s): chain 1 space(s): number denotes number of chains in chain space

ch-sp(s): chain space(s)

dc: double crochet (US sc single crochet)

lp(s): loop(s)

rep: repeat

RS: right side

sp(s): space(s)

st(s): stitch(es)

tr: treble crochet (US dc double crochet)

WS: wrong side

yoh: yarn over hook


Repeats

*......; rep from * to Work the instructions after * and then repeat that section to point indicated.

(........) once/twice/3 times Work the instructions between the brackets the total number of times stated.


Special Stitches

cc (change colour): To change colour, work the last st of the row in the old colour up to the final 2 lps on the hook, yoh with the new colour and draw the new colour through the lps on hook to finish. Continue with the new colour. Do not fasten off the old colour. Leave the yarn not in use hanging at the side of the work, ready to pick up again 2 rows later.

mtr (mosaic treble crochet): work a tr as normal but work it in the skipped st of the same colour 3 rows below, working the st in front of the intervening 2 rows of chains in contrast colour. All mtr are worked on RS of work.


PATTERN NOTES

This pattern uses inset/2-row mosaic crochet techniques:

Change colour (cc) every 2 rows.

The first row of a colour creates the pattern, the second row copies it. Where a dc or an mtr is made in the first row, a dc is made in this st in the second row (make sure to work into all mtr sts from the first row as they can easily be missed). Where a ch-sp is made in the first row, the same ch-sp is made in the second row. 

Work all tr sts into ‘skipped’ sts of the same colour 3 rows below (referred to as mtr, see Special Stitches). 

To skip one stitch, chain 2. To skip two stitches, chain 3. To skip three stitches, chain 4, and so on. This ‘extra chain’ just stops the work pulling in too much.

Always work into the full stitch as normal, not into the back loop or front loop only. There is another style of mosaic crochet which uses back and front loops only, but not this one!


INSTRUCTIONS

Do not forget to hold 2 strands of yarn together throughout!

With 2 strands of Yarn A held together, ch85.

Row 1: 1dc in second chain from hook and in each ch to end, turn. [84 sts]

Rows 2-10: Ch1 (does not count as st throughout), 1dc in each st to end. Change colour (cc) to Yarn B in final st of Row 10. Fasten off Yarn A.

Rows 11-14: Ch1, 1dc in each st to end, turn. Cc to Yarn C at end of Row 14.

Row 15: Ch1, 1dc, ch5, skip 4 sts, 17dc, ch3, skip 2 sts, 17dc, ch6, skip 5 sts, 11dc, ch6, skip 5 sts, 17dc, ch5, skip 4 sts, 1dc, turn.

Row 16: Ch1, 1dc, ch5, skip ch-5 sp, 17dc, ch6, skip ch-6 sp, 11dc, ch6, skip ch-6 sp, 17dc, ch3, skip ch-3 sp, 17dc, ch5, skip ch-5 sp, 1dc, cc to Yarn B, turn.

Row 17: Ch1, 1dc, 4mtr, 17dc, 2mtr, 17dc, 5mtr, 11dc, 5mtr, 17dc, 4mtr, 1dc, turn.

Row 18: Ch1, 1dc in each st to end, cc to Yarn C, turn.

Row 19: Ch1, 1dc, ch5, skip 4 sts, 17dc, ch3, skip 2 sts, 17dc, ch4, skip 3 sts, 15dc, ch4, skip 3 sts, 17dc, ch5, skip 4 sts, 1dc, turn.

Row 20: Ch1, 1dc, ch5, skip ch-5 sp, 17dc, ch4, skip ch-4 sp, 15dc, ch4, skip ch-4 sp, 17dc, ch3, skip ch-3 sp, 17dc, ch5, skip ch-5 sp, 1dc, cc to Yarn B, turn.

Row 21: Ch1, 1dc, 4mtr, 17dc, 2mtr, 17dc, 3mtr, 15dc, 3mtr, 17dc, 4mtr, 1dc, turn.

Row 22: Rep Row 18.

Row 23: Ch1, 1dc, ch5, skip 4 sts, 17dc, (ch3, skip 2 sts, 17dc) 3 times, ch5, skip 4 sts, 1dc, turn.

Row 24: Ch1, 1dc, ch5, skip ch-5 sp, 17dc, (ch3, skip ch-3 sp, 17dc) 3 times, ch5, skip ch-5 sp, 1dc, cc to Yarn B, turn.

Row 25: Ch1, 1dc, 4mtr, 17dc, (2mtr, 17dc) 3 times, 4mtr, 1dc, turn.

Row 26: Rep Row 18.

Row 27: Ch1, 1dc, ch13, skip 12 sts, 8dc, ch12, skip 11 sts, 8dc, ch4, skip 3 sts, 6dc, ch6, skip 5 sts, 6dc, ch11, skip 10 sts, 8dc, ch6, skip 5 sts, 1dc, turn.

Row 28: Ch1, 1dc, ch6, skip ch-6 sp, 8dc, ch11, skip ch-11 sp, 6dc, ch6, skip ch-6 sp, 6dc, ch4, skip ch-4 sp, 8dc, ch12, skip ch-12 sp, 8dc, ch13, skip ch-13 sp, 1dc, cc to Yarn B, turn.

Row 29: Ch1, 1dc, 12mtr, 8dc, 11mtr, 8dc, 3mtr, 6dc, 5mtr, 6dc, 10mtr, 8dc, 5mtr, 1dc, turn.

Row 30: Rep Row 18.

Row 31: Ch1, 1dc, ch11, skip 10 sts, 8dc, ch12, skip 11 sts, 8dc, (ch6, skip 5 sts, 6dc) twice, ch9, skip 8 sts, 8dc, ch8, skip 7 sts, 1dc, turn.

Row 32: Ch1, 1dc, ch8, skip ch-8 sp, 8dc, ch9, skip ch-9 sp, (6dc, ch6, skip ch-6 sp) twice, 8dc, ch12, skip ch-12 sp, 8dc, ch11, skip ch-11 sp, 1dc, cc to Yarn B, turn. 

Row 33: Ch1, 1dc, 10mtr, 8dc, 11mtr, 8dc, (5mtr, 6dc) twice, 8mtr, 8dc, 7mtr, 1dc, turn.

Row 34: Rep Row 18.

Row 35: Ch1, 1dc, ch9, skip 8 sts, 8dc, ch12, skip 11 sts, 8dc, ch8, skip 7 sts, 6dc, ch6, skip 5 sts, 6dc, ch7, skip 6 sts, 8dc, ch10, skip 9 sts, 1dc, turn.

Row 36: Ch1, 1dc, ch10, skip ch-10 sp, 8dc, ch7, skip ch-7 sp, 6dc, ch6, skip ch-6 sp, 6dc, ch8, skip ch-8 sp, 8dc, ch12, skip ch-12 sp, 8dc, ch9, skip ch-9 sp, 1dc, cc to Yarn B, turn.

Row 37: Ch1, 1dc, 8mtr, 8dc, 11mtr, 8dc, 7mtr, 6dc, 5mtr, 6dc, 6mtr, 8dc, 9mtr, 1dc, turn.

Row 38: Rep Row 18.

Row 39: Ch1, 1dc, ch7, skip 6 sts, 8dc, ch12, skip 11 sts, 8dc, ch10, skip 9 sts, 6dc, ch6, skip 5 sts, 6dc, ch5, skip 4 sts, 8dc, ch12, skip 11 sts, 1dc, turn.

Row 40: Ch1, 1dc, ch12, skip ch-12 sp, 8dc, ch5, skip ch-5 sp, 6dc, ch6, skip ch-6 sp, 6dc, ch10, skip ch-10 sp, 8dc, ch12, skip ch-12 sp, 8dc, ch7, skip ch-7 sp, 1dc, cc to Yarn B, turn.

Row 41: Ch1, 1dc, 6mtr, 8dc, 11mtr, 8dc, 9mtr, 6dc, 5mtr, 6dc, 4mtr, 8dc, 11mtr, 1dc, turn.

Row 42: Rep Row 18.

Row 43: Ch1, 1dc, ch5, skip 4 sts, (8dc, ch4, skip 3 sts, 6dc, ch3, skip 2 sts) twice, 6dc, ch6, skip 5 sts, 6dc, ch3, skip 2 sts, 8dc, ch4, skip 3 sts, 6dc, ch5, skip 4 sts, 1dc, turn.

Row 44: Ch1, 1dc, ch5, skip ch-5 sp, 6dc, ch4, skip ch-4 sp, 8dc, ch3, skip ch-3 sp, 6dc, ch6, skip ch-6 sp, 6dc, (ch3, skip ch-3 sp, 6dc, ch4, skip ch-4 sp, 8dc) twice, ch5, skip ch-5 sp, 1dc, cc to Yarn B, turn.

Row 45: Ch1, 1dc, 4mtr, (8dc, 3mtr, 6dc, 2mtr) twice, 6dc, 5mtr, 6dc, 2mtr, 8dc, 3mtr, 6dc, 4mtr, 1dc, turn.

Row 46: Rep Row 18.

Row 47: Ch1, 1dc, ch5, skip 4 sts, (6dc, ch6, skip 5 sts, 6dc, ch3, skip 2 sts) 3 times, 6dc, ch6, skip 5 sts, 6dc, ch5, skip 4 sts, 1dc, turn.

Row 48: Ch1, 1dc, ch5, skip ch-5 sp, 6dc, ch6, skip ch-6 sp, 6dc, (ch3, skip ch-3 sp, 6dc, ch6, skip ch-6 sp, 6dc) 3 times, ch5, skip ch-5, 1dc, cc to Yarn B, turn.

Row 49: Ch1, 1dc, 4mtr, (6dc, 5mtr, 6dc, 2mtr) 3 times, 6dc, 5mtr, 6dc, 4mtr, 1dc, turn.

Row 50: Rep Row 18.

Row 51: Ch1, 1dc, ch5, skip 4 sts, 17dc, (ch3, skip 2 sts, 17dc) 3 times, ch5, skip 4 sts, 1dc, turn.

Row 52: Ch1, 1dc, ch5, skip ch-5 sp, 17dc, (ch3, skip ch-3 sp, 17dc) 3 times, ch5, skip ch-5 sp, 1dc, cc to Yarn B, turn.

Row 53: Ch1, 1dc, 4mtr, 17dc, (2mtr, 17dc) 3 times, 4mtr, 1dc, turn.

Row 54: Rep Row 18.

Row 55: Ch1, 1dc, ch6, skip 5 sts, 15dc, (ch5, skip 4 sts, 15dc) 3 times, ch6, skip 5 sts, 1dc, turn.

Row 56: Ch1, 1dc, ch6, skip ch-6 sp, 15dc, (ch5, skip ch-5 sp, 15dc) 3 times, ch6, skip ch-6 sp, 1dc, cc to Yarn B, turn.

Row 57: Ch1, 1dc, 5mtr, 15dc, (4mtr, 15dc) 3 times, 5mtr, 1dc, turn.

Row 58: Rep Row 18.

Row 59: Ch1, 1dc, ch8, skip 7 sts, 11dc, (ch9, skip 8 sts, 11dc) 3 times, ch8, skip 7 sts, 1dc, turn.

Row 60: Ch1, 1dc, ch8, skip ch-8 sp, 11dc, (ch9, skip ch-9 sp, 11dc) 3 times, ch8, skip ch-8 sp, 1dc, cc to Yarn B, turn. 

Row 61: Ch1, 1dc, 7mtr, 11dc, (8mtr, 11dc) 3 times, 7mtr, 1dc, turn.

Rows 62-64: Ch1, 1dc in each st to end, turn. Cc to Yarn A at end of Row 64. Fasten off Yarns B and C.

Rows 65-74: Ch1, 1dc in each st to end, turn. Fasten off Yarn A. Weave in all ends.


To Edge the 2 Short Sides:

Edging is worked along the 2 short 'raw' sides only. Working your edging dc stitches over any visible loops where the yarn has been carried up the side of the work will help to conceal them.

First Side

With RS facing, join 2 strands of Yarn A held together with a ss in the first row-end on one side.

Row 1 (RS): Ch1, 1dc in same row-end as join, 1dc in each of next 3 row-ends, *skip next row-end, 1dc in each of next 4 row-ends; rep from * to end, turn.

Row 2 (WS): Ch1, 1dc in each st to end. Fasten off.

Work Second Side as for First Side.

Weave in all ends.

Safety First

Safety is of course paramount with rugs and mats so that they are not a slip hazard. There are several products on the market to stop your mat being slippy underfoot, my preferred method is to cut a piece of non-slip underlay to the same size as my mat, and sew it on carefully and securely to the underside. But whichever method you use, PLEASE be careful. Safety first.